Animation for Urealms Live S3 Finale: Storyboarding and Production

Continuing from the previous post.

DragonFight_TimelineDescription.png

I created this diagram for Pat and I to have a visual layout of the story and how it would play out. It’s split into segments describing the flow of the action and the pacing, sort of an emotional approximation for the 2-3 minutes we had to show the fight.

With the knowledge we pulled from our anime reference, now we can use it to make our own hyper shonen anime fight! But we have to do it in 2-3 months. How do we stop ourselves from cutting too much quality or spending too much time on one part?

First, it should be important to note that in the examples I gave before, the Build-up and the Aftermath are the most complex to animate because they have more detailed movements and descriptions. So we can use this in our planning.

I created a Google Sheet that has a chart with every shot we planned in the animation:

firefox_2018-09-30_19-43-48.png

This way, both Pat and I can view and edit the contents of the Sheet. I was also able to create the legend diagram on the left side and lock it so that neither Pat or I could move it around accidentally. Organization!


As you can see, the legend has two pieces. It has the first column, D, which denotes the completion of the shots. (Since I was the one wrapping up all of the effects at the end, it was redundant to mark them “completed” on the document, woops).
The 2nd column, E, is where we started. This has a color code for how complicated the scene would theoretically be to animate. The idea was to spread the workload around so that there were only a few High complexity scenes, a handful of Medium complexity scenes, and then everything else was Low complexity.

We worked from High to Low, that way if we ended up working down to the wire, we could cut corners and rush on the low complexity scenes and it wouldn’t be as damaging to the final product. Wouldn’t it suck if you had to rush on the climax of your entire animation?

PureRef_2018-09-30_20-09-02.png

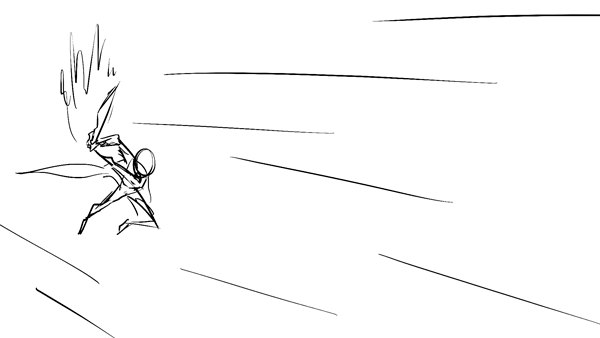
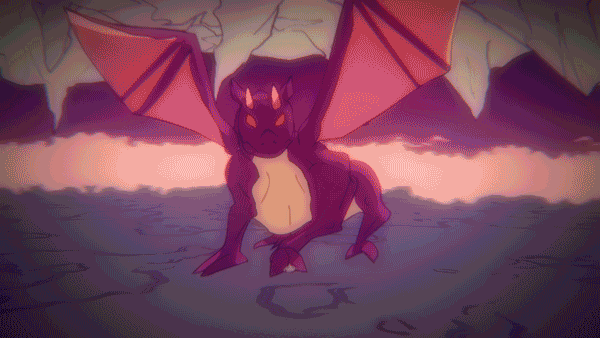
Pat drew up this storyboard for Shot 1, and then I took it into Photoshop to paint a color key. It was important for me to shade it with glows and stuff because this would help me visualize and aim for the final results when I started compositing in After Effects. It’s important to keep yourself inspired and motivated to work on the project, so taking time to do these previews is really helpful when you have to do so much repetitive work!

The red version is for the “2nd phase” of the animation when the dragon emerges from the lava pool. I wanted to set a tone shift where things felt more sinister, it also breaks it up from the rest of the animation so it feels more colorful and alive.  You can notice a couple of things from my painting above, there is a green atmosphere around everything, like in the background. But the light source and the mist has a blue eerie glow to it. There is also a touch of vibrant purple in the background around the edges of the mist, it helps unify the colors with the characters skin which has some red highlights on the edges of shadow to simulate Subsurface Scattering. It makes the skin feel more fleshy and alive, and that vibrant pop of red becomes a bit lonely without something similar echoed in the background.

vlc_2018-09-30_20-18-02.png

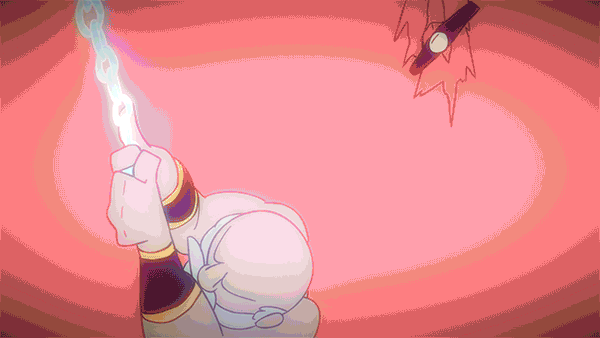
And here you can see the same shot in the final animation. Notice how the glows help all those colors pop? Having a plan from the beginning really helps in the later stages. In fact, one of the major things Pat and I focused on was having a full month of planning. Doing storyboards and rough animation only. This allowed us a lot of flexibility when things didn’t go the way we wanted to. And that happened quite a bit.

Character Design

You can see a construction lines image on the left for Bruce and Virgo. This is so Pat and I both can draw the characters with the same shapes and forms. Otherwise you could run into problems like one of us seeing Bruce’s head as more of an oval than a circle, or making the beard bigger than it is in the reference without understanding how the original artist drew the beard in proportion to the head.

Dragon concepts, Pat messed around with different animal reference, like dog hind legs and spines. This made the dragon more unique than just being a big bulky lizard with wings.

Designing Bruce

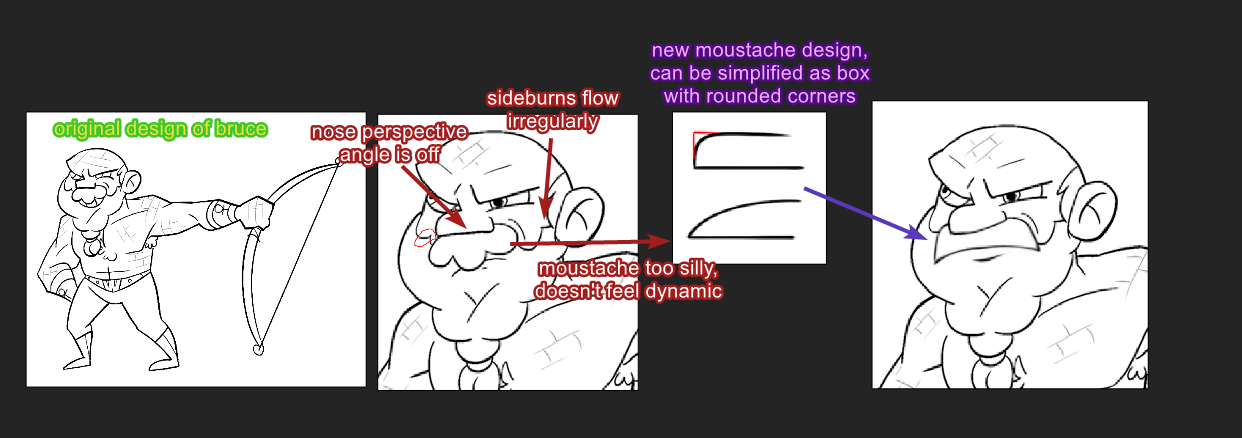
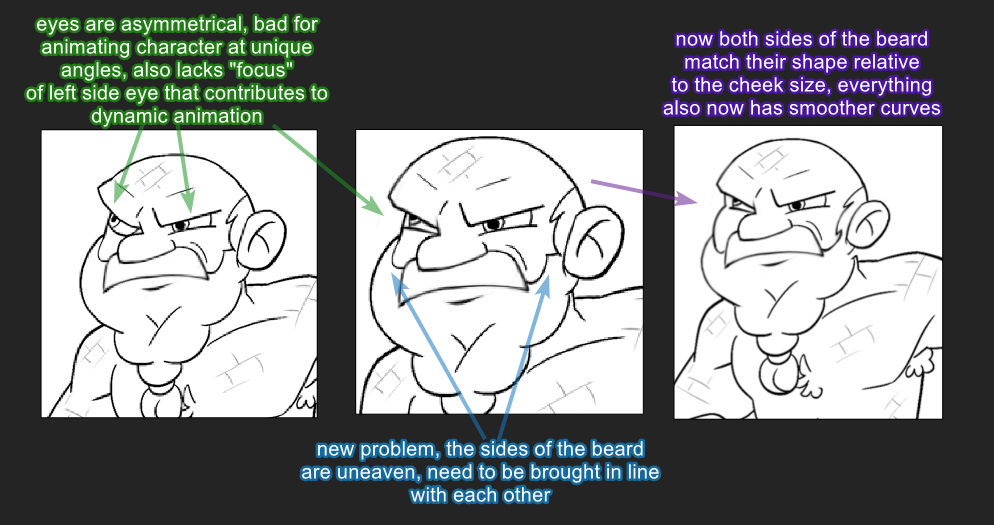
These are most of the images Pat and I shared back and forth with each other over Discord. Pat drew up the concept and I went through and made these corrections to fit more with my overall idea of the animation.

Besides style, I also went through to catch some consistency errors. Regardless of skill level, all artists can get caught up in a web of ideas and having a third party to view your work is crucial to catching some things that you are unable to see while working on a clock. The shape of the eyebrows, and the positioning and shape of the beard between the left and right side of the head needed touch ups. In hindsight, we realized we should have designed Bruce from a front view as well to solve a few issues that came from rotating some of Bruce's features.

Designing Virgo

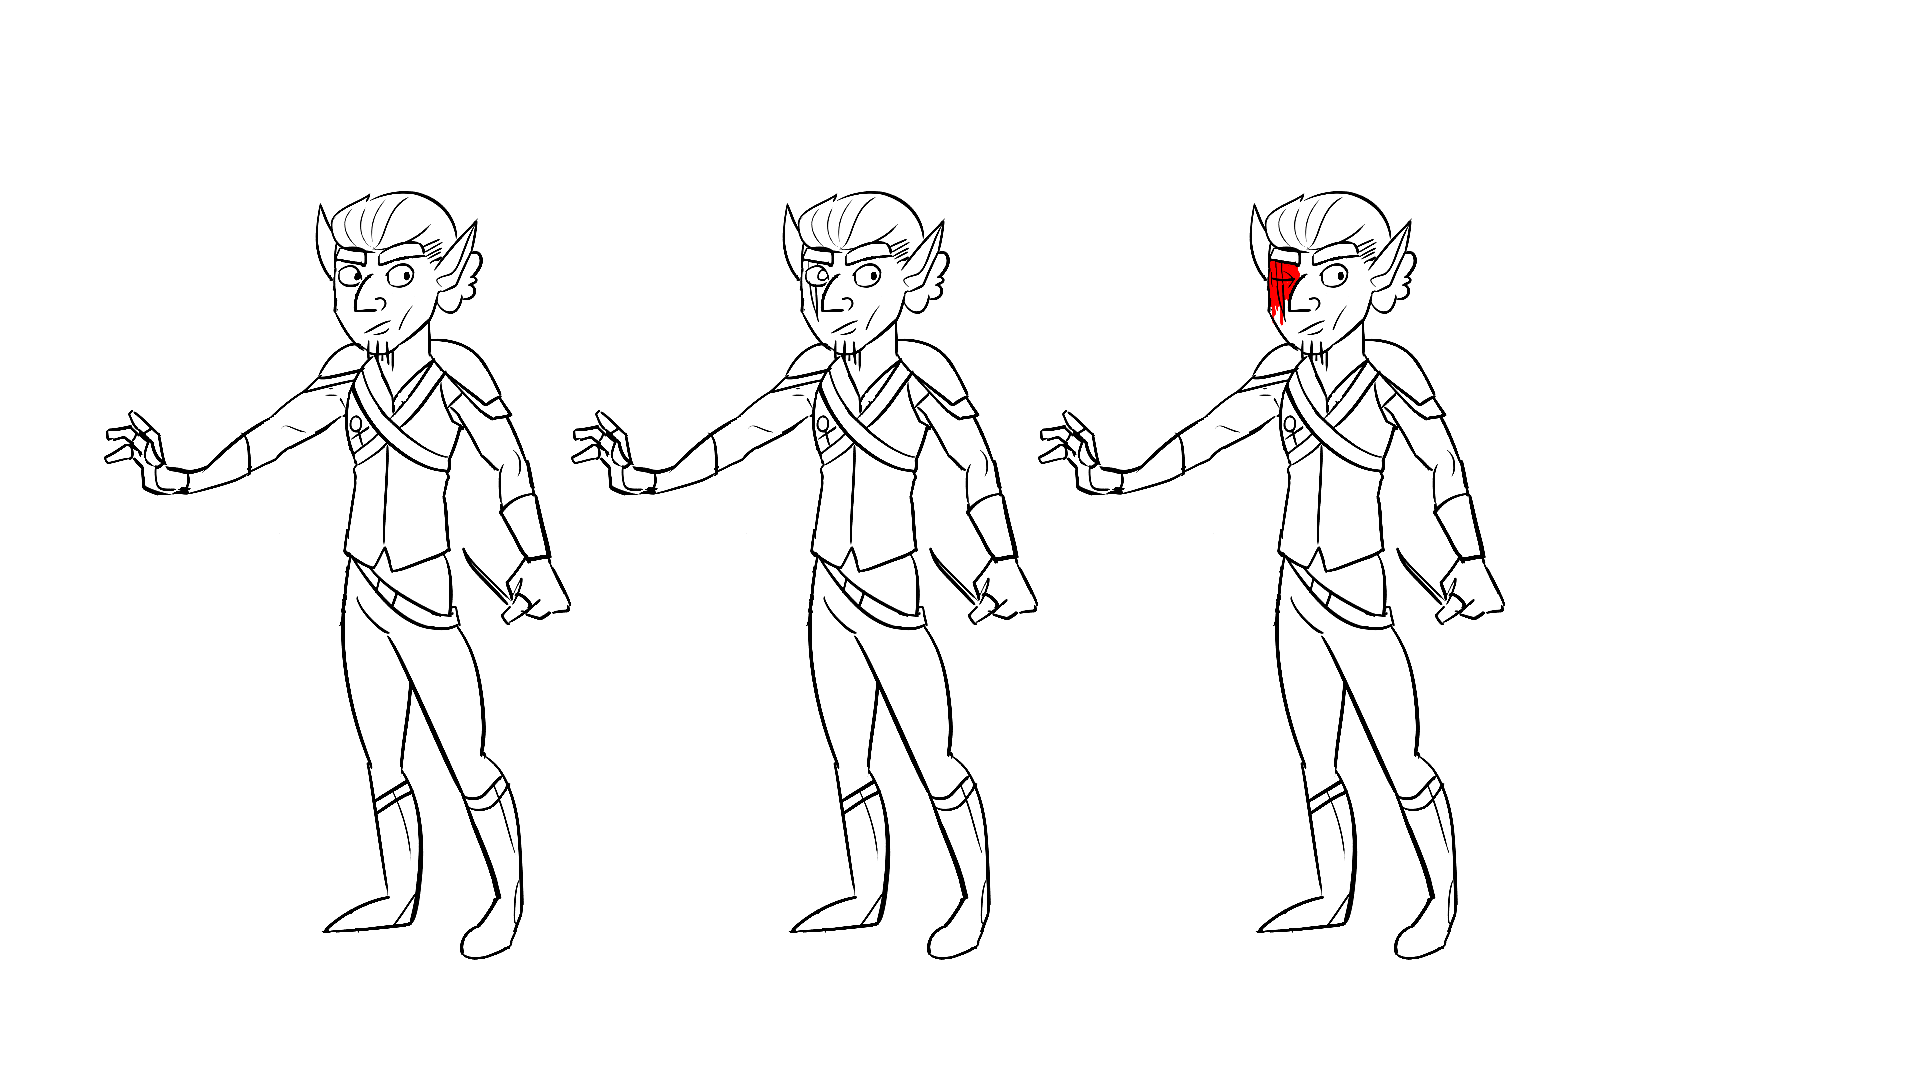
Not a lot of changes were made to Virgo’s design actually. The only one was that he had a rounded cheek on one side whereas there was a line on the opposite side implying Virgo had very pronounced cheekbones. So the cheek was made to have a straighter and more angular look, which also goes with the “dynamic” feel for the style we talked about with Bruce. His nose was also updated to be more angular, the nostril shape was removed and merged with the bottom portion to look a little sleeker.

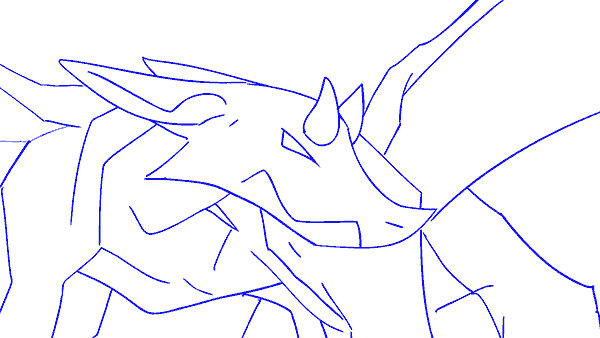
Designing Virendra (Dragon)

Pat actually did a lot of animal anatomy research to create the dragon. Above are all of his notes. He did a lot of analysis to match the action oriented approach I wanted to take, merging the teeth with the head silhouette, and showing how the dragon would use each body part as with the emphasis on the wings being like hands, almost like a bat. We wanted a more slender body, and Pat achieved this by basing the body of the dragon on a dog. You can see this in the drawing above where the tail is curved up. I had Pat change this to be a tail that was floppier and heavier, more like a lizard tail because the curve made it a little too dog like.

Production

Pat and I had a main setup for collaborating on our animations. We used Toon Boom to animate with, and then saved our project files into a Google Drive folder that we maintained a sync with. This way changes were constantly shared between us and we could always check new changes in real time.

Clover_2018-10-04_17-10-39.png

Toon Boom allows us to quickly color our shots, as well as providing the Cutter tool, which allows artists to draw clean lines by letting you slice off lines that overlap too much. So instead of having to create a rounded corner by drawing, stopping, and changing direction; you can simply draw two lines intersecting and use gesture flicks to slice off the parts you don’t need.


As a final note on the general production, we ran into timing issues where things didn’t last long enough. Moments would be over too quick, which when you are working frame by frame, you forget how fast the animation actually moves when you play it all together. I ended up making new animations that had quick closeups on character faces, and showing looped animations that padded the timings. Since I was in a rush, I ended up hilariously rendering them out as “0.75” and “0.5”.

Clover_2018-10-04_18-33-58.png

2D Animation Process for Urealms Live Season 3 Finale

So, we are finally here. After planning this finale animation back in September 2017 I can finally talk about this project and all the work that went into it .Rob asked me if I would do a finale animation for Urealms around the beginning of September 2017. At the time, I was already interested in doing more 2D animation projects because I had been helping Pat (PatManDx) with one of his Urealms fan animations about the Boecoe crew.

I thought, “Well, by myself this finale would be stressful and a disaster.”

But, I have a knack for directing and collaborating with others, and Pat is an extremely skilled animator. With Rob’s approval to pay both Pat and I, the deed was done. My extroverted personality naturally fit into a more supervisor position to help things glide along as Pat pushed his nose near the grindstone, entering “The Zone” to blast this animation to the finish line.

Conceptualization and Planning

At the beginning of the project I had one thing very clear in my mind: Animation takes much more time and energy than you plan to use. We had about three months to create the animation, but the entire time I was pushing myself as if we really only had one month. I was working part time retail, and Pat was working on his animation finals for University, I didn’t want to let myself get too comfy.

We had a summed up project statement, “Create an intense anime style action sequence, ~2 minutes in duration in ~2 months.” But how do you achieve that?

Sakuga style animation takes an entire studio several weeks, the term Sakuga itself refers to increasing the number of drawings required to create fluid movement. Usually, animators use 1 drawing per 24 frames in Sakuga sequences, as opposed to the mere 4 drawings required for the lip flaps in dialogue scenes where characters do not move their bodies.

The answer, well partly, was to watch a shite load of anime of course! Fortunately I saved time by already accomplishing that step. I went through some of the most highly rated sequences amongst anime fans and broke them down frame by frame. Even in extremely important story moments, animators still find clever ways to cut corners while keeping impact, which I’d like to outline next.

Examples and Understanding Dynamic Action

My Hero Academia Season 1 Footage

My Hero Academia Season 1 Footage

Here we see the character All Might from the anime My Hero Academia punching. The animation is still complex, but the main forces here are his hair flipping around, which you can see loops in these images, the first hair frame and the last hair frame are the same drawing.
    The FX animation is doing a significant amount of the work however, and is arguably easier to animate (and more fun!) because you don’t need to worry about staying on model or keeping proportions, you simply rely on animating mass and expansion. The entire time this punch occurs, the music is rising, and the energy in the punch is building. All Might’s hair is flipping around to show wind and pressure, and it doesn’t need much attention besides a simple loop. Neat huh?

A large part of the solution towards these epic attacks is in the timing.

Action anime revolves around build up. How many times have you seen an anime and noticed this feeling:

The battlefield is momentarily calm, our hero stands ragged and beaten in a cloud of debris. You hear a chuckle and the villain stands before the hero proud, touting about how he cannot be beaten. ‘Oh no!’ We think to ourselves, ‘There’s no way the hero can win!’ But in a moment of silence, only the sound of wind drifting along we see the hero clench their fist. They speak confidently in defiance of the villain. We feel a spark ignite in the bottom of our belly, a rising melody occurs, silently at first but quickly building! We see a closeup of the hero’s eye as he raises his head to meet the gaze of the villain, and in turn, us. He builds his ultimate attack, unrelenting he raises his voice again to defy the villain in the name of justice! Faster than the villain expects, the hero launches himself into range, armed with his master technique. He yells triumphantly as we feel a craterous impact, unknowingly our arm twitches as we sit on the edges of our seats. The punch thrown is immense, bludgeoning the villain with inertia that is as slow as a dissociating afternoon at the dentist’s office. The melody that rose from our belly is now a roaring fire, and finally, a pause. What? Did it- BOOOOOOM! The punch is released as the villain flies across the face of the planet, through several mountains, and into outer space. The power can not be defined, it’s just too good. Streams of energy waft from the fist of our hero as the villain screams ‘IT’S NOT POSSIBLE!’

Hopefully I’m a good enough writer that I could emulate that feeling. To understand this scene, we break it down into several segments:

Whitebeard from One Piece

Whitebeard from One Piece

1) Calm Before the Storm

There needs to either be no music, or the music needs to come to a lull. This is where the audience needs to take in the surroundings, their attention needs to be drawn to moment at hand, the thoughts and feelings of the hero.
    In anime, the audience is the hero too, so they need to empathize and collect themselves in the moment. I like to think of it as the moment before the drop on a rollercoaster, where you survey the landscape and take in the height.


Gohan in Dragon Ball Z: Bojack Unbound

Gohan in Dragon Ball Z: Bojack Unbound

2) The Spark

The moment where the match for our hype rocket is struck. This acts as a small moment of foreshadowing, that “Wait, wait, something’s up!”. This can be accomplished with a literal spark of energy from the hero, or maybe the villain’s grin turns to a frown. Something to change the flow emotionally. This is where the music starts to rise.


Midoriya Izuku from My Hero Academia

Midoriya Izuku from My Hero Academia

3) The Build-Up

This almost acts as a two part, but each part blends seamlessly here. Anime’s accomplish this build up in a multitude of ways: Using flashbacks that remind the hero of where they started, or show the conviction that led to this moment. You can also use literal action, showing the power collecting towards their behemoth of a punch/attack (i.e. Goku’s spirit bomb size). The entire time the music is building up while you use your method of choice.
    As part of the intensity of the build, we bleed into the actual attack landing on the enemy. The attack should almost push into the enemy, more like a shove than a punch. The attack should lean into the enemy for several seconds, it’s much longer than you would think as the animator. But it’s key that the actual attack is part of the buildup. The punch itself isn’t what brings the audience that sense of satisfaction, it’s the aftermath.


One Punch Man

One Punch Man

4) Aftermath

This is even more important than the actual attack. All of the pieces are necessary to bring the “oomph” moment we outlined previously, but the aftermath is the money-maker. You can get very creative here, exaggerate the crap out of the attack. You can show the attack splitting the clouds, changing the weather. You could show a mass of friction being created as flames burst forward, charring the enemy. Shockwaves, lightning, tornadoes, and any scientific phenomena you can theorize or imagine will do the trick.
    The effect this brings in the audience is that we don’t know how strong the hero is from the punch. If the enemy is defeated, great. But we want to know just what unfathomable consequences arise from the hero’s attack. He threw a punch that was so casual, but it created tornadoes?! What? Exactly.
    That’s how cool he is.

With these four points in mind, you don’t need to have every piece of animation as fluid as possible. In fact it usually isn’t! During the creation of the animation, we imagined Virgo’s sword slash as the entire buildup phase, but it had no impact when the shots were played all together.  

2018-03-07_05-41-08.gif

The slash was way too fast. We had to pad it with extra scenes where we would cut to the dragon (Virendra for you nerds) with a zoom in, then cut to Bruce looking shocked for that emotional oomph (if Bruce is shocked, we should be too!).