"Sci-Fi" Armor Plate Offset shader inside Unity breakdown

(I’ve been meaning to make this write up post for a while to explain how I went about this effect. Since this effect uses Houdini primarily I’m structuring it to be aimed at beginner’s who may not know Houdini very well, so any veteran Houdini users you have fair warning if I don’t use very much shorthand!)

INTRODUCTION

A couple of months ago a friend of mine Brandon Savanco (@branxord on twitter) was asking about how to go about creating this “plate offset” effect inside Unity on the Real Time VFX discord. The basic premise is that he had a series of cubes laid out in an arch and wanted to offset each cube using a vertex shader. The problem is that normal data is pointed in a different direction for each vertex, making an inflation effect when you use it to offset positions.

Instead what you need to do is, make these normals point in the same direction for each “group of vertices” you want to move.

I’ve learned a good bit of Houdini and had to convert normal data around before, so I thought this effect would be the perfect use for it. There were some bumps along the way though, but in the process I learned a great deal about Unity shaders, and how data is processed and transferred between applications.

STARTING OFF

An important note for the rest of this article: Houdini treats the terms “point” and “vertex” as two different things, while most 3D packages treat them both as the same thing. When we export our geometry from Houdini into Unity and such, we need to make sure we convert any “point” attributes to vertex attributes, or they might not work. Just some forewarning if you try anything here and it acts strange.

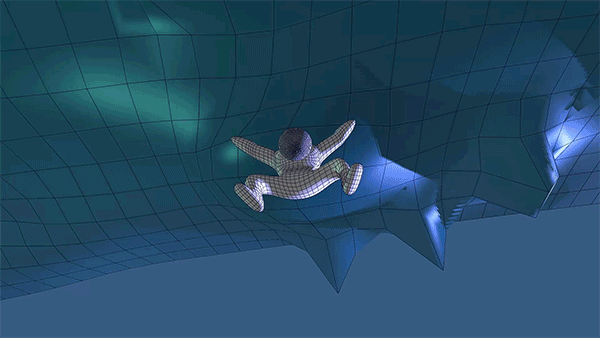
Let’s look at the finished effect using the example Brandon first wanted to make:

The boxes are moving how they should inside Houdini! But there are a couple quirks present immediately when trying to make this work. Vertex normals are usually used to calculate shading information on the surfaces of geometry.

It’s very important for this purpose that normals are pointing out relative to the angle of the geometry, otherwise you get some wonkiness. 
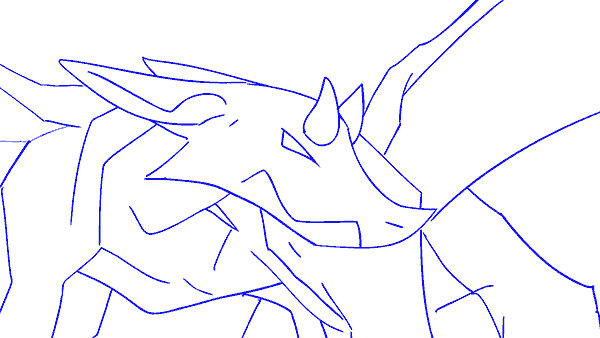
Here is the basic result we wanted in Houdini, I’ve set all of the normals to point upward along the Y axis using a vector of (0,1,0):

Here we are seeing the standard normal data represented by both vertex color and the normal blue lines.

My compromise was to keep the normals as is for shading, and in a second node tree inside Houdini, grab the normals, average them per plate we want to offset, and then transfer them to the unedited plates as a vertex color attribute, @Cd:

The most straightforward way I thought to do this was to:

  1. generate the normals (as @N point attribute)
  2. blur @N to get an average of all the normals so they are basically pointed the same direction
  3. Then we convert @N to @Cd (point attribute acting as vertex color). After this, it’s important to make extra sure that every plate’s vertices are the exact same. An easy way to make that happen is to convert the attribute to a primitive attribute (primitive in Houdini terms is basically a polygon face). This applies the same information across all vertices that are connected to the polygon in question. Then we just convert back to a point attribute.

At the end of the hierarchy are two nodes that are doing something I haven’t touched on yet. As part of the compromise solution above, I mentioned that I made a second node tree and then transferred them back to the original plates.

The way I’m doing this is by creating an @id point attribute using the Connectivity SOP node. This will assign a number to represent all vertices that are connected together by edges. This essentially maps out our individual plates vertices as a group we can use later. There’s another more advanced reason we want this @id point attribute that I’ll go into later. So if you are thinking this is a bit redundant right now, don’t worry I know! It’s just nice to have flexibility later on.

So what we do is create two @id point attributes for both node hierarchies, and then we can use them with the Attribute Transfer SOP. This will paste our @Cd/vertex color information to our @N normal plates, but using their shared @id attribute! Very useful for a lot of techniques.

So back to the final effect again, you can see the normals are pointing outward as usual, and you can see the beautiful hue of green cubes. The reason they are shades of green are because the normals we are using to offset are mostly pointed up, and if you think of the direction up in an (x,y,z) sense, you get (0,1,0). Now, think of that as (r,g,b), and you’ll have 1 in the green channel, meaning up is green! This basically proves that our effect is working with a visual indicator.

ADDING MORE ADVANCED MOVEMENT

That was the end of the effect there, but I wanted to play around and try doing more things with this effect because converting data is very addicting. First I made this prettier effect using some rounded tiles with offset sine waves to create some randomness while I changed up the colors. This used extra attributes so we wouldn’t be able to put this in Unity, just some Houdini fun.

Now we get to the “Armor” part of this effect. In typical Houdini user fashion I used the default pig head as the mesh for this, and then I extruded out some plates to represent armor for our pig warrior. I won’t go into the modeling process too much here, I essentially just extruded polygons out and deleted the rest of the mesh to separate them. I also wanted the plates to have a nicer look so I added a bevel to them and weighted the normals so we could get a nice glint on the edges.

I had some existing shader work I had from following a tutorial from Freya Holmer (@FreyaHolmer, she’s written Shader Forge and created Budget Cuts!), I think it’s a basic blinn or phong shader with some metal shading mixed in. I plugged my armored pig head into the same hierarchy we made before and popped it into unity.

I somehow didn’t get any video of this, but essentially the armor was offsetting, but it was at strange angles. I racked my brain on it for a long time, It looked perfectly fine inside of Houdini, but it was wrong in Unity. I realized later though that the pieces were offsetting towards the positive sides of the axis, like towards the right side for anything move along X, for example. A quick Google search revealed that while Houdini can store normal directions in vertex color, once you export that data into a file it gets clamped to 0 to 1. So now our color has no “opposite direction” to point in, it can only point forward along our axes! The trick here is that we now have to “compress” our color from a -1 to 1 range, into a 0 -1 range. You can do this a few ways, but the way I default to is just to add 1 to @Cd, and then divide @Cd by 2. Now, once you are inside Unity, you must take the vertex color data, subtract it by 0.5, and then multiply by 2. Voila! Now you have -1 to 1 inside Unity. And I screamed when I cracked this code:

Beautiful.

UV’S AND MESSING WITH ARRAYS

But I wanted to go even further. I didn’t like that I was compensating by using a bunch of sin and cos waves on different axes directions to create a faux random offset. I wanted to do an effect where all the plates pushed out in a wave vertically along the pig head. I quickly ran into a problem here, because I couldn’t use the vertex positions, because they were representing individual vertices and thus my plates wouldn’t move as plates. Back to square one like with normals, but the problem is I can’t store this data as vertex color anymore, I already did that for the normal offset. Since I only needed a vertical direction, I figured I didn’t need to store anything in a full vector. I could store it in the UV’s! And just like the normals, we will be averaging the UV positions down to a single point or number, so that every plate has the same data applied to it.

This one took me a lot of time, and the solution I ended up using was a bit convoluted and not necessary for the effect. I thought I screwed up the effect early on but I actually just forgot to convert the @uv attribute in Houdini from a point attribute to a vertex attribute. The difference between “points” and “vertices” is very important in Houdini. Vertices are aware of what edge or polygons they are attached to, and have data relevant to that. It’s pretty important to have that information for things like UVs, because if you want to separate a vertex into two vertices for a texture seam, you need knowledge of what is connected where. Without it, data gets scrambled and fused in crazy ways. WITH THAT IN MIND, this solution is a little crazy, but it is still a useful trick to know.

I wrote some comments (the text in yellow) to clear up some things about the VEX here. If you are new to programming and are freaking out about the foreach loop or the array attribute, I decided to split off my epiphany that I had during that process that helped me learn about arrays into a separate article since this one is getting really long and it’s a bit too much of a departure from the Main Point™ of this breakdown. If you are curious the link is here. If you don’t know how arrays work at all, I highly recommend reading it as it comes from the point of view of someone who struggles with math and logic.

If you don’t want to read all of that, you can just use that code and not worry about it. The nodes after that “uv_average” wrangle with all the code are “truncate_uvs” and “promote_uv_to_vertex”.

“Promote_uv_to_vertex” is really important here, without it the data won’t work properly inside Unity, and you’ll get madness like this:

We are using an attribute promote SOP node to convert our point attribute @uv and converting it to a vertex attribute with the same name.

The “truncate_uvs” isn’t strictly necessary, but I threw it on there to try and solve a different problem that didn’t end up appearing. I basically used the trunc VEX function to snap our @uv point attribute to simpler numbers. So for example, instead of having 2.45617 as a position, it would become 2.45. You can do this with float numbers by multiplying them by the number of decimals you want to keep, in this case, 100. Then you use trunc (which stands for Truncate) to remove all the decimal points from the number. So now we should have 245 with no decimals. Now, we divide this number by the same number we multiplied by, which is 100, and now we have 2.45. Pretty neat! It can be helpful to reduce the amount of precision in decimals when you are inside games, particularly since we don’t need fine differences between our UV positions anyways for this effect.

And now with that, we have UV’s based on our objects alignment in Y space. Inside our shader we can view our UV’s V coordinate and we should see something like this:

And then we can plug it into our normal offset, and we will get the final effect!

BONUS: Houdini Array and Foreach Explanation

Continuing from the Armor Plate Offset Breakdown post, I’m going to elaborate on some programming and VEX epiphanies I had while struggling to implement that effect. Just for the sake of demonstration for this bonus article I’ll be using the same screenshot here:

I still don’t perfectly know how to wrap my head around foreach and arrays, but the more I explain it the better I get it, so here goes:

Here’s a basic rundown of what the goal we are trying to accomplish:

  1. We have a bunch of cubes floating around, separated from each other. We want to run code on all the points inside a particular cube, without affecting any other cubes.
  2. We can create an @id point attribute per cube, so cube 0 will have an @id of 0 for example. And all the points inside that cube will have an @id attribute of 0.
  3. We want to take all of the points inside a certain @id and average all their point positions to be the same, essentially collapsing them on top of each other. Then we use that as the UV for the cubes.

We are addressing 1 and 2 by creating the @id point attribute. By connecting all our cube geometry to a connectivity SOP node, and setting the attribute name to id.

Now to do 3, we’ll need a foreach loop in order to cycle an operation across collections of point attribute data, one at a time. So unlike normally in VEX, where code runs on all points one at a time, you can run on specific sets of points all at once. It takes a few moments to wrap your head around this if you aren’t familiar with programming logic, or as I like to call it, being “math brained”.

It gets easier to understand if we keep going. For our foreach function to work, we need two variables/attributes. We need an empty integer variable that the foreach will use to count each “cycle”. You can think of this like when you are counting the number of items in an inventory, you need to write down what you’ve already counted so you don’t forget. So this variable is empty because it’s like a piece of blank paper you are giving the code to write down it’s counting. On the image above, that’s the “int ct;” line. “ct” stands for count.

And the second thing we need is an array that is filled with all of the data we want our “count” variable to, well, count. I called this “counts[]”. The brackets [ ] mean that this variable is an array. Arrays are confusing in Houdini, because they store multiple sets of data inside them. Kind of like how vectors store three different components, arrays can store as many components as you set them to have. This looks very different from typical attribute data however, and this can trip you up if you are inexperienced like me. I'll use the @id data to show the difference between that and an array.

So if we think of one of our floating cubes with @id point attribute, we can identify each point inside “cube 0”; in this case those points are 0,1,4,5,52,53,54, and 55. So each of those have an @id of 0, because they are inside “cube 0”. But what we need is to run code ON these points all at the same time, so we have to create a new variable/attribute that is an array holding all these points. In the picture above, you can see that each point in “cube 0” has an array that is a list of all the other points also inside “cube 0”. You can also notice that the array has a specific order that matches the order of the points, this is an important quality of arrays, they store data in an order that doesn’t necessarily have to be from small to large.

But, how do we get these points inside an array? You need to use this function called findattribval. It does what you think, it finds the value of an attribute, but then it outputs the point number that belongs to that value. But it has two important uses, from the documentation:

So if you use findattribval inside of an array variable, you can get ALL of the point numbers for a certain value. This is perfect for us, because now we can ask findattribval:

Return all the point numbers inside our geometry, with a point class, with @id attribute, based on the @id number.

So now we will have an array that contains every point number belonging to a certain @id value, but assigned to each point number with that @id number.

AND NOW that we have both a counter variable, and an array for it to count, we can plug in to our foreach loop. On cycle 0, the counter variable will run our code on each point number inside the array at once, instead of one at a time.

For additional help on arrays, here’s a fantastic video from David Kahl who has a lot of other great resources for VEX tricks that are pretty hard to find online:

Animation for Urealms Live S3 Finale: Storyboarding and Production

Continuing from the previous post.

DragonFight_TimelineDescription.png

I created this diagram for Pat and I to have a visual layout of the story and how it would play out. It’s split into segments describing the flow of the action and the pacing, sort of an emotional approximation for the 2-3 minutes we had to show the fight.

With the knowledge we pulled from our anime reference, now we can use it to make our own hyper shonen anime fight! But we have to do it in 2-3 months. How do we stop ourselves from cutting too much quality or spending too much time on one part?

First, it should be important to note that in the examples I gave before, the Build-up and the Aftermath are the most complex to animate because they have more detailed movements and descriptions. So we can use this in our planning.

I created a Google Sheet that has a chart with every shot we planned in the animation:

firefox_2018-09-30_19-43-48.png

This way, both Pat and I can view and edit the contents of the Sheet. I was also able to create the legend diagram on the left side and lock it so that neither Pat or I could move it around accidentally. Organization!


As you can see, the legend has two pieces. It has the first column, D, which denotes the completion of the shots. (Since I was the one wrapping up all of the effects at the end, it was redundant to mark them “completed” on the document, woops).
The 2nd column, E, is where we started. This has a color code for how complicated the scene would theoretically be to animate. The idea was to spread the workload around so that there were only a few High complexity scenes, a handful of Medium complexity scenes, and then everything else was Low complexity.

We worked from High to Low, that way if we ended up working down to the wire, we could cut corners and rush on the low complexity scenes and it wouldn’t be as damaging to the final product. Wouldn’t it suck if you had to rush on the climax of your entire animation?

PureRef_2018-09-30_20-09-02.png

Pat drew up this storyboard for Shot 1, and then I took it into Photoshop to paint a color key. It was important for me to shade it with glows and stuff because this would help me visualize and aim for the final results when I started compositing in After Effects. It’s important to keep yourself inspired and motivated to work on the project, so taking time to do these previews is really helpful when you have to do so much repetitive work!

The red version is for the “2nd phase” of the animation when the dragon emerges from the lava pool. I wanted to set a tone shift where things felt more sinister, it also breaks it up from the rest of the animation so it feels more colorful and alive.  You can notice a couple of things from my painting above, there is a green atmosphere around everything, like in the background. But the light source and the mist has a blue eerie glow to it. There is also a touch of vibrant purple in the background around the edges of the mist, it helps unify the colors with the characters skin which has some red highlights on the edges of shadow to simulate Subsurface Scattering. It makes the skin feel more fleshy and alive, and that vibrant pop of red becomes a bit lonely without something similar echoed in the background.

vlc_2018-09-30_20-18-02.png

And here you can see the same shot in the final animation. Notice how the glows help all those colors pop? Having a plan from the beginning really helps in the later stages. In fact, one of the major things Pat and I focused on was having a full month of planning. Doing storyboards and rough animation only. This allowed us a lot of flexibility when things didn’t go the way we wanted to. And that happened quite a bit.

Character Design

You can see a construction lines image on the left for Bruce and Virgo. This is so Pat and I both can draw the characters with the same shapes and forms. Otherwise you could run into problems like one of us seeing Bruce’s head as more of an oval than a circle, or making the beard bigger than it is in the reference without understanding how the original artist drew the beard in proportion to the head.

Dragon concepts, Pat messed around with different animal reference, like dog hind legs and spines. This made the dragon more unique than just being a big bulky lizard with wings.

Designing Bruce

These are most of the images Pat and I shared back and forth with each other over Discord. Pat drew up the concept and I went through and made these corrections to fit more with my overall idea of the animation.

Besides style, I also went through to catch some consistency errors. Regardless of skill level, all artists can get caught up in a web of ideas and having a third party to view your work is crucial to catching some things that you are unable to see while working on a clock. The shape of the eyebrows, and the positioning and shape of the beard between the left and right side of the head needed touch ups. In hindsight, we realized we should have designed Bruce from a front view as well to solve a few issues that came from rotating some of Bruce's features.

Designing Virgo

Not a lot of changes were made to Virgo’s design actually. The only one was that he had a rounded cheek on one side whereas there was a line on the opposite side implying Virgo had very pronounced cheekbones. So the cheek was made to have a straighter and more angular look, which also goes with the “dynamic” feel for the style we talked about with Bruce. His nose was also updated to be more angular, the nostril shape was removed and merged with the bottom portion to look a little sleeker.

Designing Virendra (Dragon)

Pat actually did a lot of animal anatomy research to create the dragon. Above are all of his notes. He did a lot of analysis to match the action oriented approach I wanted to take, merging the teeth with the head silhouette, and showing how the dragon would use each body part as with the emphasis on the wings being like hands, almost like a bat. We wanted a more slender body, and Pat achieved this by basing the body of the dragon on a dog. You can see this in the drawing above where the tail is curved up. I had Pat change this to be a tail that was floppier and heavier, more like a lizard tail because the curve made it a little too dog like.

Production

Pat and I had a main setup for collaborating on our animations. We used Toon Boom to animate with, and then saved our project files into a Google Drive folder that we maintained a sync with. This way changes were constantly shared between us and we could always check new changes in real time.

Clover_2018-10-04_17-10-39.png

Toon Boom allows us to quickly color our shots, as well as providing the Cutter tool, which allows artists to draw clean lines by letting you slice off lines that overlap too much. So instead of having to create a rounded corner by drawing, stopping, and changing direction; you can simply draw two lines intersecting and use gesture flicks to slice off the parts you don’t need.


As a final note on the general production, we ran into timing issues where things didn’t last long enough. Moments would be over too quick, which when you are working frame by frame, you forget how fast the animation actually moves when you play it all together. I ended up making new animations that had quick closeups on character faces, and showing looped animations that padded the timings. Since I was in a rush, I ended up hilariously rendering them out as “0.75” and “0.5”.

Clover_2018-10-04_18-33-58.png

2D Animation Process for Urealms Live Season 3 Finale

So, we are finally here. After planning this finale animation back in September 2017 I can finally talk about this project and all the work that went into it .Rob asked me if I would do a finale animation for Urealms around the beginning of September 2017. At the time, I was already interested in doing more 2D animation projects because I had been helping Pat (PatManDx) with one of his Urealms fan animations about the Boecoe crew.

I thought, “Well, by myself this finale would be stressful and a disaster.”

But, I have a knack for directing and collaborating with others, and Pat is an extremely skilled animator. With Rob’s approval to pay both Pat and I, the deed was done. My extroverted personality naturally fit into a more supervisor position to help things glide along as Pat pushed his nose near the grindstone, entering “The Zone” to blast this animation to the finish line.

Conceptualization and Planning

At the beginning of the project I had one thing very clear in my mind: Animation takes much more time and energy than you plan to use. We had about three months to create the animation, but the entire time I was pushing myself as if we really only had one month. I was working part time retail, and Pat was working on his animation finals for University, I didn’t want to let myself get too comfy.

We had a summed up project statement, “Create an intense anime style action sequence, ~2 minutes in duration in ~2 months.” But how do you achieve that?

Sakuga style animation takes an entire studio several weeks, the term Sakuga itself refers to increasing the number of drawings required to create fluid movement. Usually, animators use 1 drawing per 24 frames in Sakuga sequences, as opposed to the mere 4 drawings required for the lip flaps in dialogue scenes where characters do not move their bodies.

The answer, well partly, was to watch a shite load of anime of course! Fortunately I saved time by already accomplishing that step. I went through some of the most highly rated sequences amongst anime fans and broke them down frame by frame. Even in extremely important story moments, animators still find clever ways to cut corners while keeping impact, which I’d like to outline next.

Examples and Understanding Dynamic Action

My Hero Academia Season 1 Footage

My Hero Academia Season 1 Footage

Here we see the character All Might from the anime My Hero Academia punching. The animation is still complex, but the main forces here are his hair flipping around, which you can see loops in these images, the first hair frame and the last hair frame are the same drawing.
    The FX animation is doing a significant amount of the work however, and is arguably easier to animate (and more fun!) because you don’t need to worry about staying on model or keeping proportions, you simply rely on animating mass and expansion. The entire time this punch occurs, the music is rising, and the energy in the punch is building. All Might’s hair is flipping around to show wind and pressure, and it doesn’t need much attention besides a simple loop. Neat huh?

A large part of the solution towards these epic attacks is in the timing.

Action anime revolves around build up. How many times have you seen an anime and noticed this feeling:

The battlefield is momentarily calm, our hero stands ragged and beaten in a cloud of debris. You hear a chuckle and the villain stands before the hero proud, touting about how he cannot be beaten. ‘Oh no!’ We think to ourselves, ‘There’s no way the hero can win!’ But in a moment of silence, only the sound of wind drifting along we see the hero clench their fist. They speak confidently in defiance of the villain. We feel a spark ignite in the bottom of our belly, a rising melody occurs, silently at first but quickly building! We see a closeup of the hero’s eye as he raises his head to meet the gaze of the villain, and in turn, us. He builds his ultimate attack, unrelenting he raises his voice again to defy the villain in the name of justice! Faster than the villain expects, the hero launches himself into range, armed with his master technique. He yells triumphantly as we feel a craterous impact, unknowingly our arm twitches as we sit on the edges of our seats. The punch thrown is immense, bludgeoning the villain with inertia that is as slow as a dissociating afternoon at the dentist’s office. The melody that rose from our belly is now a roaring fire, and finally, a pause. What? Did it- BOOOOOOM! The punch is released as the villain flies across the face of the planet, through several mountains, and into outer space. The power can not be defined, it’s just too good. Streams of energy waft from the fist of our hero as the villain screams ‘IT’S NOT POSSIBLE!’

Hopefully I’m a good enough writer that I could emulate that feeling. To understand this scene, we break it down into several segments:

Whitebeard from One Piece

Whitebeard from One Piece

1) Calm Before the Storm

There needs to either be no music, or the music needs to come to a lull. This is where the audience needs to take in the surroundings, their attention needs to be drawn to moment at hand, the thoughts and feelings of the hero.
    In anime, the audience is the hero too, so they need to empathize and collect themselves in the moment. I like to think of it as the moment before the drop on a rollercoaster, where you survey the landscape and take in the height.


Gohan in Dragon Ball Z: Bojack Unbound

Gohan in Dragon Ball Z: Bojack Unbound

2) The Spark

The moment where the match for our hype rocket is struck. This acts as a small moment of foreshadowing, that “Wait, wait, something’s up!”. This can be accomplished with a literal spark of energy from the hero, or maybe the villain’s grin turns to a frown. Something to change the flow emotionally. This is where the music starts to rise.


Midoriya Izuku from My Hero Academia

Midoriya Izuku from My Hero Academia

3) The Build-Up

This almost acts as a two part, but each part blends seamlessly here. Anime’s accomplish this build up in a multitude of ways: Using flashbacks that remind the hero of where they started, or show the conviction that led to this moment. You can also use literal action, showing the power collecting towards their behemoth of a punch/attack (i.e. Goku’s spirit bomb size). The entire time the music is building up while you use your method of choice.
    As part of the intensity of the build, we bleed into the actual attack landing on the enemy. The attack should almost push into the enemy, more like a shove than a punch. The attack should lean into the enemy for several seconds, it’s much longer than you would think as the animator. But it’s key that the actual attack is part of the buildup. The punch itself isn’t what brings the audience that sense of satisfaction, it’s the aftermath.


One Punch Man

One Punch Man

4) Aftermath

This is even more important than the actual attack. All of the pieces are necessary to bring the “oomph” moment we outlined previously, but the aftermath is the money-maker. You can get very creative here, exaggerate the crap out of the attack. You can show the attack splitting the clouds, changing the weather. You could show a mass of friction being created as flames burst forward, charring the enemy. Shockwaves, lightning, tornadoes, and any scientific phenomena you can theorize or imagine will do the trick.
    The effect this brings in the audience is that we don’t know how strong the hero is from the punch. If the enemy is defeated, great. But we want to know just what unfathomable consequences arise from the hero’s attack. He threw a punch that was so casual, but it created tornadoes?! What? Exactly.
    That’s how cool he is.

With these four points in mind, you don’t need to have every piece of animation as fluid as possible. In fact it usually isn’t! During the creation of the animation, we imagined Virgo’s sword slash as the entire buildup phase, but it had no impact when the shots were played all together.  

2018-03-07_05-41-08.gif

The slash was way too fast. We had to pad it with extra scenes where we would cut to the dragon (Virendra for you nerds) with a zoom in, then cut to Bruce looking shocked for that emotional oomph (if Bruce is shocked, we should be too!).

Being A Grasshopper: Learning Styles

To preface this post before I get way too into it, I’ve been scrutinizing myself over this blog. The pressure of what my “very first blog post will be oh nooo…” The feeling that anything I really have the urge to talk about is too unrefined and as I’m writing it the appeal starts to wear off, and I think, “this really isn’t the kind of idea I should make into a formal statement."
It’s like losing your virginity! And just like losing your virginity, you just sorta need to do what feels right so that you can move on with your life and stop wondering “What if?”

This is about something I talked about for way too long over text with a friend of mine, about how I have a weird quirky way of learning things. The reason I have the urge to delete this post immediately before some kind of keyboard gnome can post my possibly unrefined and embarrassing personal thoughts, is that this topic seems sort of like a cross between frustration and also narcissistic obsession. But oh well I feel like I have to start writing something on here for my own sanity because everyone I rant to needs to get on with their day, but a blank page loves you unconditionally. Accept me, blank page.

Anyways, Grasshopper Learning

I read an article a few years ago, I think it was recommended to me by a teacher, about an old education concept of “Grasshoppers” and “Inchworms”. It’s stuck with me ever since, when I feel stumped on a concept I’m trying to learn I think back to this article to help give me a compass to overcome my obstacle.

The idea is that there are two groups of people: Grasshoppers like to “hop” from one concept to another based on their interest in it. It doesn’t matter the difficulty level of the subject or that it requires pre-requisite knowledge to attempt, the Grasshopper will attempt to learn it.

Inchworms operate how most educational programs are designed, chronologically. For Inchworms to succeed in learning, they need to build a basic foundation and then add more difficult concepts over time until they master the subject.

You can clearly get a picture of what these two types of people could be like, Grasshoppers are impatient and curious, and Inchworms are relaxed and thorough. Obviously, I am a Grasshopper. And yes, I’m definitely impatient and curious, much to the dismay of my close friends who get caught in the hallway after I just read about fusion reactor research progress.

The thing that interests me about this topic is that based on the description, Inchworms have a seemingly superior method objectively compared to the Grasshopper. They do not attempt challenges beyond their skill level, thus wasting less time and building a more well rounded education.

And this is exactly how Grasshopper types feel about themselves, until they discover that they are Grasshopper types. Without a label, Grasshoppers feel broken, misdirected and maybe they get called lazy or stupid. But both learning types offer invaluable traits to each person, and I think this is why this topic burns on my brain so much.

The Advantages:

  1. Grasshoppers are more likely to think of unique solutions. The reason Grasshoppers are so carefree about tackling effectively random topics on a whim is because they are able to apply concepts from other areas of their knowledge to help them understand a new concept. It’s like, if you haven’t used a fork before, but you can write with a pen, it isn’t too difficult to apply the concepts since a fork is similar in shape and use to a pen. Grasshoppers are able to apply that kind of “jump” in understanding on a broader level however, sometimes in ways that are invisible even to them, the concept just “makes sense.” Because of that, they can get bored quickly and skim over easier stuff to find something challenging.

  2. On the other foot, Inchworms have an advantage over Grasshoppers. Even though Inchworms are slower to eventually master the highest level of a concept, Grasshoppers can lack essential or key components that can keep them from even starting projects. Inchworms have consistent, guaranteed knowledge that means that they will provide a solution and they will do it with assured success. They also have less personal feelings about projects and will work regardless of their interest or personal gain.

I started writing this without really knowing why I wanted to. It was just on my mind. I hope to more consistently put some of my thoughts here, that I usually only share with close friends, to help me and to help others who struggle with similar subjects as me. For all the Grasshoppers out there, there is nothing wrong with the way you learn. Take your strengths and weaponize them, and be mindful of where you lack interest or commitment and avoid those situations.